Kubernetes

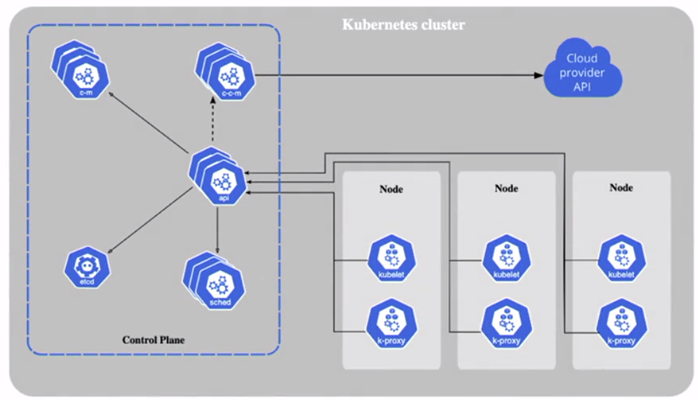
A Cluster is an instance of Kubernetes. Each cluster has a Control Plane, and at least one Worker node.
The Control Plane contains the components that manage a cluster, and enable the resiliency and automation that make Kubernetes such a popular container orchestrator.
It’s a collection of the following components:
- kube api server: exposes the Kubernetes api with a REST interface. Kubernetes objects have API endpoints.
- kubectl and kubeadm are CLI tools to communicate with the Kubernetes API via HTTP requests.
- “kubectl api-resources” list all Kubernetes objects and API versions.
- the kube api server is a containerized application that runs in the “kube-system” namespace. Use the command “kubectl get pods -n kube-system” to view the kube api server information.
- etcd
- open-source high-available key-value store
- that saves all data about the cluster
- has communication only with the kube api server.
- run a pod
-
the command “kubectl logs etcd-minikube -n kube-system jq .” to see the logs
- kube scheduler (sched)
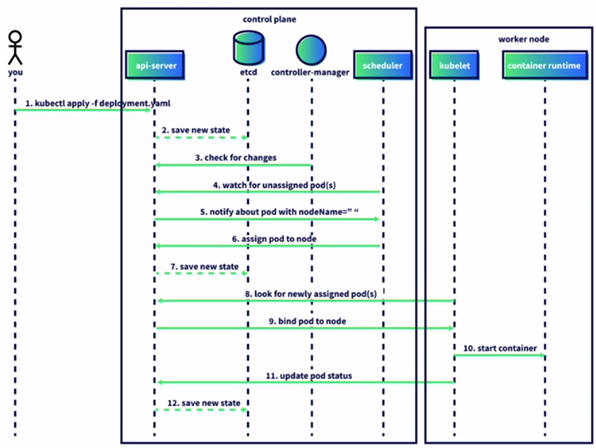
- identifies newly created pods that have not been assingned to a worker node.
- choose a node for new pods run on.
- run as a pod
- can also has logs analyzed.
- kube controller manager (c-m)
- runs in a loop to check the cluster’s status
- it’s responsible for replacing broken worker nodes with new worker nodes.
- it’s responsible for checking other things.
- cloud controller manager (c-c-m)
- connect the cluster with cloud provider’s API like AWS, Azure, GCP, or any public cloud, allowing the use of cloud resources.
Kubernetes objects
- Pods
- Deployments
- Horizontal pod autoscaler
Worker Nodes
The Worker Nodes are where pods are scheduled and run, and each worker node has three components.
- Kubelet
- an agent that runs on every worker node
- makes sure that the containers in a pod have started running and are healthy
- communicates directly with the api-server in the control plane looking for newly assigned pods.
- Container Runtime
- A Kubelet assigned to new pod starts a container using Container Runtime Interface (CRI)
- CRI enables the Kublet to create containers with the engines:
- Containerd
- CRI-O
- Kata Containers
- AWS Firecracker
- Kube-proxy
- makes sure pods and services can communicate with other pods and services on nodes, and in the control plane.
- each kube-proxy communicates directly with the kube api-server.

Ways to manage Kubernetes pods
-
DaemonSet: DaemonSets allow you to run one pod per node, which works well for running pods implementing background processes such as agents.
-
Deployment: Allows to control the number of replicas running. Roll out new instances without no downtime.
-
Job: A Kubernetes Job will spin up a pod, run the container until its task is complete, and then terminate the pod. A Job is best for applications that perform one-time operations, like an ETL.
-
StatefulSet: A statefulSet is an object that lets an updated Kubernetes application communicate with the same volume as the previous pod.
minikube
minikube is local Kubernetes, focusing on making it easy to learn and develop for Kubernetes.
All you need is Docker (or similarly compatible) container or a Virtual Machine environment, and Kubernetes is a single command away: minikube start
Cheat Sheet
minikube management
- minikube start (start a cluster)
- minikube update-check (verify/update minikube version)
- minikube stop (stop a cluster)
- minikube delete (delete a cluster)
- minikube tunnel (connect to loadbalancer services)
- minikube dashboard (access the Kubernetes dashboard running within the minikube cluster)
cluster management
- kubectl cluster-info
- kubectl cluster-info dump
nodes management
- kubectl get nodes (return cluster information)
- kubectl get services -A
namespaces management
- kubectl apply -f <namespace config file> (file with configuration of namespaces)
- kubectl get namespaces or kubectl get ns
- kubectl delete -f <namespace config file> (file with configuration of namespaces)
pods management
- kubectl apply -f <deployment config file> (file with configuration for containers deployment)
- kubectl get pods (list all pods in the default namespace)
- kubectl get pods -A (lists the pods from all the namespaces)
- kubectl get pods -n <namespace> (list the pods for an especific namespace)
- kubectl get pods -n <namespace> -o wide (list the pods for an especific namespace with extra information like IP)
- kubectl delete pod <pod name> -n <namespace>
- kubectl describe pod <pod name> -n <namespace> (Show the events log of the pod. If a pod has been running for a while, Kubernetes will assume it is healthy and not show its events.)
- kubectl logs <pod name> -n <namespace> (display the logs of an application in a especific pod and namespace)
Creating Namespaces
Namespaces isolate and organize workloads.
- Create a namespace.yaml file with two different namespaces.
---
apiVersion: v1
kind: Namespace
metadata:
  name: development
---
apiVersion: v1
kind: Namespace
metadata:
  name: production
-
Execute “kubectl apply -f namespace.yaml” to create the namespaces.
-
Execute “kubectl get namespaces” to list the namespaces.
-
Execute “kubectl delete -f namespaces.yaml” to delete the namespaces.
Deploying an application
- Create a deployment.yaml file with the following configuration.
---
apiVersion: apps/v1
kind: Deployment
metadata:
  name: pod-info-deployment
  namespace: development
  labels:
    app: pod-info
spec:
  replicas: 3
  selector:
    matchLabels:
      app: pod-info
  template:
    metadata:
      labels:
        app: pod-info
    spec:
      containers:
      - name: pod-info-container
        image: kimschles/pod-info-app:latest
        ports:
        - containerPort: 3000
        env:
          - name: POD_NAME
            valueFrom:
              fieldRef:
                fieldPath: metadata.name
          - name: POD_NAMESPACE
            valueFrom:
              fieldRef:
                fieldPath: metadata.namespace
          - name: POD_IP
            valueFrom:
              fieldRef:
                fieldPath: status.podIP
-
Execute the command “kubectl apply -f deployment.yaml” to deploy the containers.
-
Execute the command “kubectl get deployments -n development” to check the containers status.
-
Execute the command “kubectl get pods -n development” to check the pods that the deployment created.
-
Execute the command “kubectl delete pod <pod name> -n development” to delete the pod from the development namespace. You’ll see that it will be replaced automatically by a new pod.
Troubleshooting an application
Pod’s Events Log
It’s possible to check the health of a pod by looking at the event logs. For that, execute the command “kubectl describe pod <pod name> -n development” and find the events log of the pod.
BusyBox
BusyBox is a tool to check the application working.
- Create the busybox.yaml with the following configuration.
---
apiVersion: apps/v1
kind: Deployment
metadata:
  name: busybox
  namespace: default
  labels:
    app: busybox
spec:
  replicas: 1
  selector:
    matchLabels:
      app: busybox
  template:
    metadata:
      labels:
        app: busybox
    spec:
      containers:
      - name: busybox-container
        image: busybox:latest
        # Keep the container running
        command: [ "/bin/sh", "-c", "--" ]
        args: [ "while true; do sleep 30; done;" ]
        resources:
          requests:
            cpu: 30m
            memory: 64Mi
          limits:
            cpu: 100m
            memory: 128Mi
-
Execute the command “kubectl apply -f busybox.yaml” to deploy the pod in the default namespace.
-
Execute the command “kubectl get pods” to check the BusyBox deployment.
-
Execute the command “kubectl exec -it <busybox pod name> – /bin/sh” to enter in busybox pod.
-
Execute the command “kubectl get pods -n development -o wide”.
-
Get one the IP address from the list of the previous command, and in the BusyBox shell, execute the command “wget <ip address>:PORT”.
-
Execute the command “cat index.html” to view the contents of the file generated by the previous command. If the application is OK, the file index.html should contain the information about the pod especified in the development.yaml.
-
Execute the command “exit” to get out of the BusyBox.
Application Logs
-
Execute the command “kubectl get pods -n development” and pic a name of one the pods.
-
Execute the command “kubectl logs <pod name> -n development” to display the pod’s log.
Expose an application to the internet with a LoadBalancer
-
Execute the command “minikube tunnel” to allow simulation of exposing the services via load balancer to external world.
-
Create the file service.yaml with the following content.
---
apiVersion: v1
kind: Service
metadata:
  name: demo-service
  namespace: development
spec:
  selector:
    app: pod-info
  ports:
    - port: 80
      targetPort: 3000
  type: LoadBalancer
-
Execute the command “kubectl apply -f service.yaml”.
-
Execute the command “kubectl get services -n development” to obtain the EXTERNAL-IP (public ip).
-
Get the EXTERNAL-IP addres, open an web browser, and put the ip address in the address bar. The result may look like the following.
{
    "pod_name": "pod-info-deployment-757cb75bbb-rth4x",
    "pod_namespace": "development",
    "pod_ip": "10.244.0.6"
}
Add resource requests and limits to a pod
- Update the file deployment.yaml with this new content. It includes the resources specification.
---
apiVersion: apps/v1
kind: Deployment
metadata:
  name: pod-info-deployment
  namespace: development
  labels:
    app: pod-info
spec:
  replicas: 1
  selector:
    matchLabels:
      app: pod-info
  template:
    metadata:
      labels:
        app: pod-info
    spec:
      containers:
      - name: pod-info-container
        image: kimschles/pod-info-app:latest
        resources:
          requests:
            memory: "64Mi"
            cpu: "250m"
          limits:
            memory: "128Mi"
            cpu: "500m"
        ports:
        - containerPort: 3000
        env:
          - name: POD_NAME
            valueFrom:
              fieldRef:
                fieldPath: metadata.name
          - name: POD_NAMESPACE
            valueFrom:
              fieldRef:
                fieldPath: metadata.namespace
          - name: POD_IP
            valueFrom:
              fieldRef:
                fieldPath: status.podIP
- Execute the command “kubectl apply -f deployment.yaml.” to replace the containers with the new configuration.
Deleting Kubernetes objects and tear down the cluster
Execute the following commands:
- kubectl delete -f busybox.yaml
- kubectl delete -f deployment.yaml
- kubectl delete -f quote.yaml
- kubectl delete -f service.yaml
- kubectl delete -f namespace.yaml
- minikube delete